组件化开发
组件化开发
React 组件类别
根据组件的定义方式,可以分为:函数组件
(Functional Component)和类组件(Class Component); 根据组件内部是否有状态需要维护,可以分成:无状态组件(Stateless Component)和有状态组件(Stateful Component); 根据组件的不同职责,可以分成:展示型组件(Presentational Component)和容器型组件(Container Component); 函数组件、无状态组件、展示型组件主要关注 UI 的展示; 类组件、有状态组件、容器型组件主要关注数据逻辑;
类组件
- 类组件需要继承自
React.Component render()方法是类组件中唯一必须实现的方法constructor是可选的,通常在constructor中初始化一些数据;this.state用来维护组件数据
import React, { PureComponent } from 'react'

export class App extends PureComponent {
  constructor() { ... }

  render() {
    return (
      <div>...</div>
    )
  }
}
函数式组件
export function App(props) {
  // 返回值: 和类组件中render函数返回的是一致
  return (
    <div>...</div>
  )
}
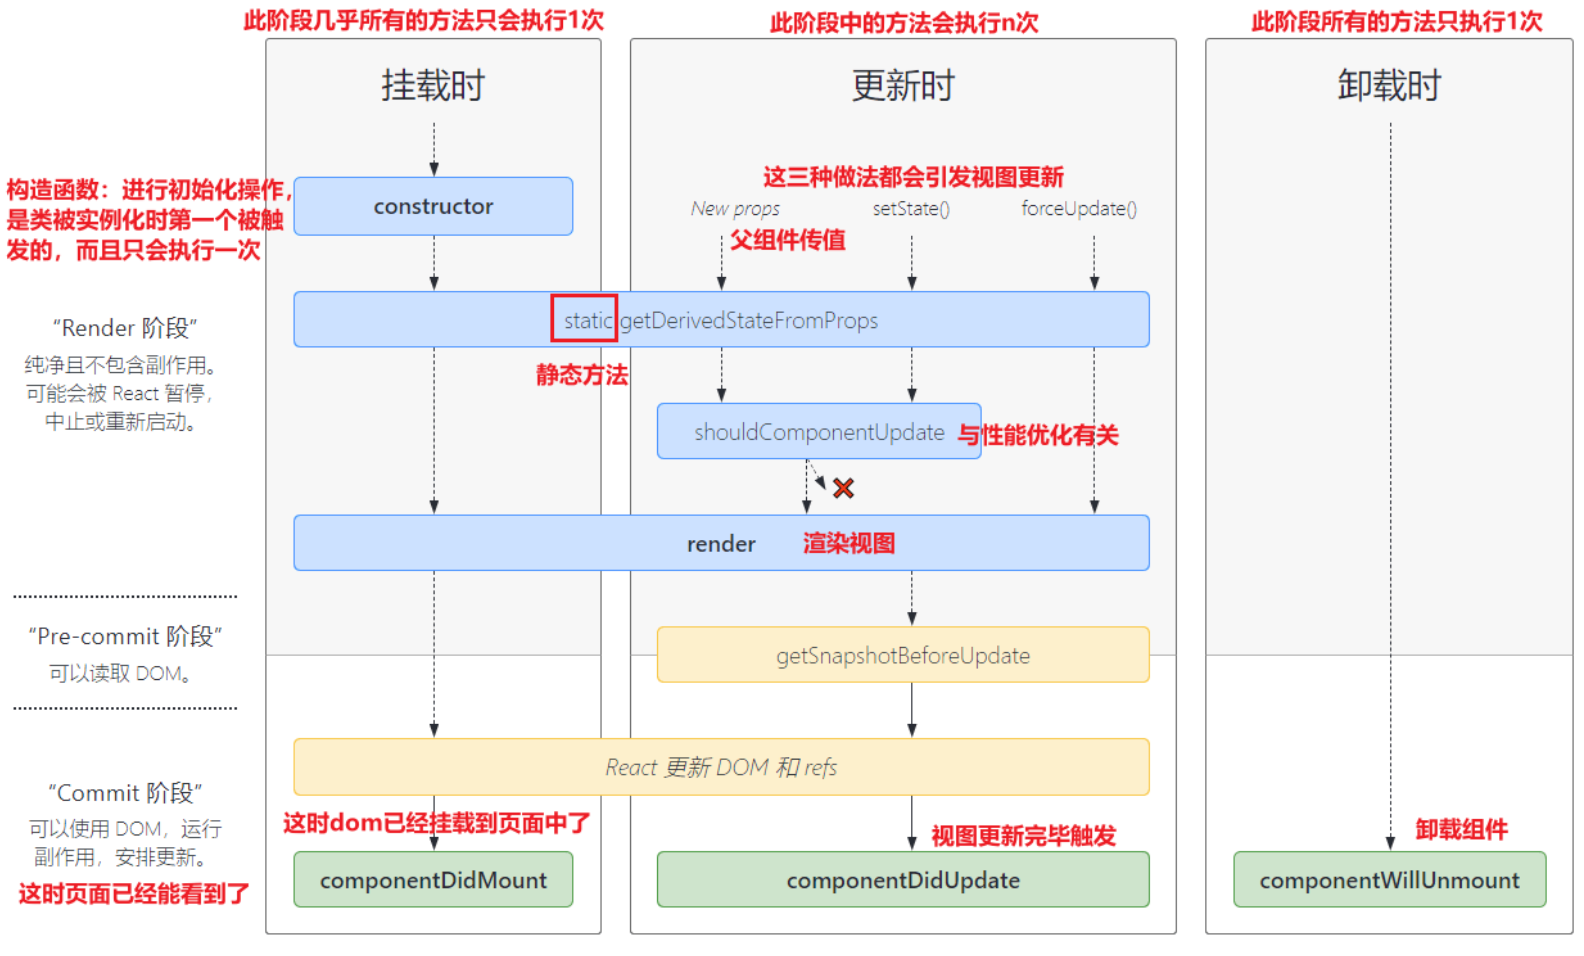
组件生命周期

Mounting 挂载阶段
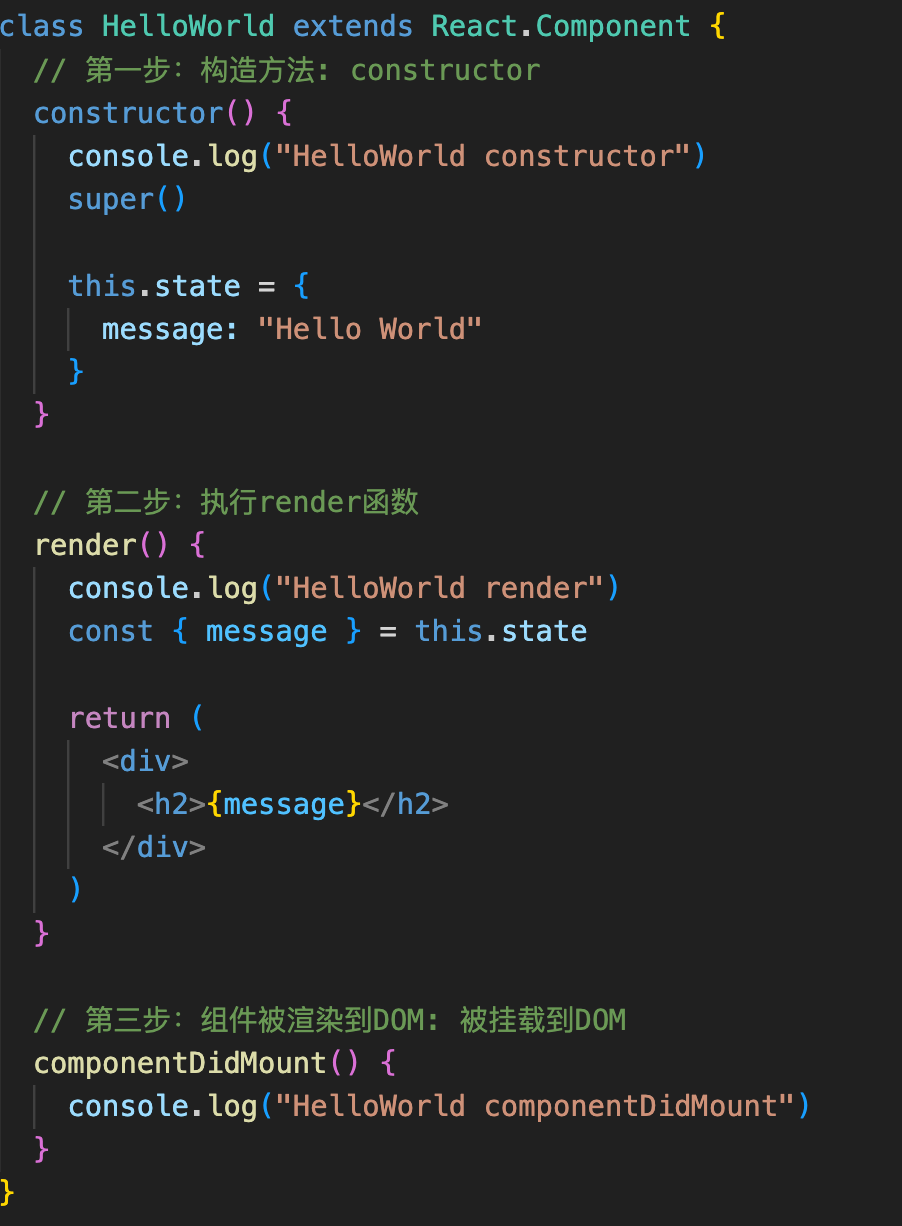
constructor→render→componentDidMount

Constructor
- 如果不初始化
state或不进行方法绑定,则不需要为React组件实现构造函数。 constructor中通常只做两件事情:- 通过给 t
his.state赋值对象来初始化内部的state; - 为事件绑定实例(
this);
- 通过给 t
ComponentDidMount
- 在组件挂载后(插入
DOM树中)立即调用 - 依赖于
DOM的操作可以在这里进行 - 在此处发送网络请求就最好的地方
- 可以在此处添加一些订阅(会在
componentWillUnmount取消订阅)
Updating 更新阶段
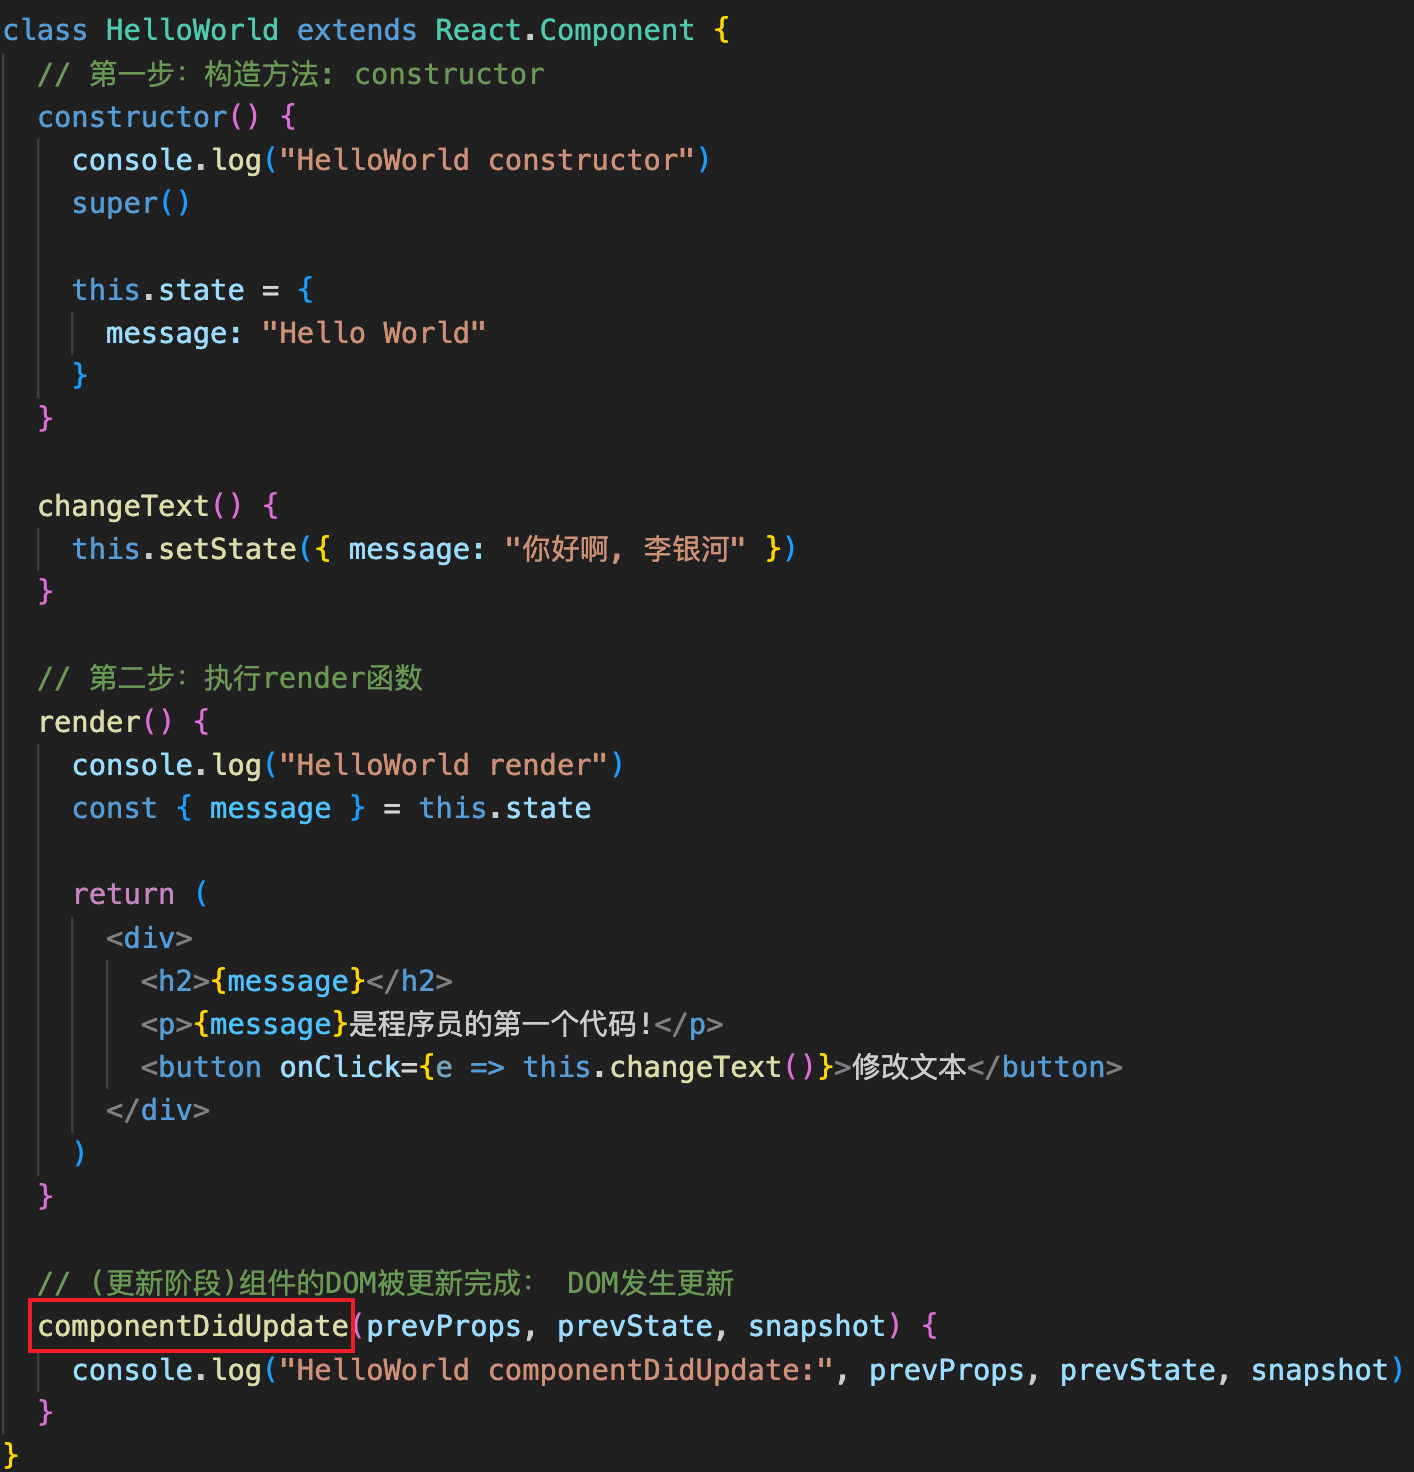
setState()→render→componentDidUpdate

Unmounting 卸载阶段
  // (卸载阶段)组件从DOM中卸载掉:从DOM移除掉
  componentWillUnmount() {
    console.log("HelloWorld componentWillUnmount")
  }
不常用生命周期补充
  // 是否需要组件更新时重新渲染界面
  shouldComponentUpdate() {
    return true
  }

  // 获取Dom更新前的数据快照(componentDidUpdate之前),返回的scrollPosition可以在componentDidUpdate中获取到
  getSnapshotBeforeUpdate() {
    console.log("getSnapshotBeforeUpdate")
    return {
      scrollPosition: 1000
    }
  }
父子组件通信
父传子
父组件通过
属性=值或属性展开的形式来传递给子组件数据。< MainBanner banners={banners} title="轮播图"/> // 或(属性展开) const info = {banners, title="轮播图"} < MainBanner {...info}/>子组件通过
props参数获取父组件传递过来的数据。‼️ 若没有
state,可以不写constructor,在render中依然可以获取this.props。class MainBanner extends React.Component{ constructor(props) { // 从父组件中获取数据存入props super(props); this.state = { ... }; } render() { const { ... } = this.state; const { banners } = this.props; } }
PropTypes 类型验证
MainBanner.propTypes = {
  // isRequired表示必须传入
  banners: PropTypes.array.isRequired,
  title: PropTypes.string
}
defaultProps 默认传值
MainBanner.defaultProps = {
  banners: [],
  title: "默认标题"
}

// ES16写法(在 React 类组件中将 defaultProps 声明为静态属性)
static defaultProps = {
    banners: [],
    title: "默认标题"
}
子传父
通过props让父组件给子组件传递一个回调函数,在子组件中调用这个函数。
// 父组件
class Father extends Component {
  constructor() {
    super()

    this.state = {
      counter: 100
    }
  }

  changeCounter(count) {
    this.setState({ counter: this.state.counter + count })
  }

  render() {
    const { counter } = this.state

    return (
      <div>
        <h2>当前计数: {counter}</h2>
        < Son  addClick={(count) => this.changeCounter(count)}/>
      </div>
    )
  }
}

// 子组件
class Son extends Component {
  addCount(count) {
    this.props.addClick(count)
  }

  render() {
    return (
      <div>
        <button onClick={e => this.addCount(1)}>+1</button>
      </div>
    )
  }
}
父子组件通信案例(TabBar)
- 父组件传递
titles变量给子组件。 - 子组件通过发送事件
this.props.tabClick()将索引传递给父组件。
// 子组件
export class TabControl extends Component {
  constructor() {
    super()

    this.state = {
      currentIndex: 0
    }
  }

  itemClick(index) {
    // 1.自己保存最新的index
    this.setState({ currentIndex: index })

    // 2.让父组件执行对应的函数
    this.props.tabClick(index)
  }

  render() {
    const { titles } = this.props
    const { currentIndex } = this.state

    return (
      <div className='tab-control'>
        {
          titles.map((item, index) => {
            return (
              <div className={`item ${index === currentIndex?'active':''}`} key={item} onClick={e => this.itemClick(index)}>
                <span className='text'>{item}</span>
              </div>
            )
          })
        }
      </div>
    )
  }
}
// 父组件
class App extends Component {
  constructor() {
    super()

    this.state = {
      titles: ["流行", "新款", "精选"],
      tabIndex: 0
    }
  }

  tabClick(tabIndex) {
    this.setState({ tabIndex })
  }

  render() {
    const { titles, tabIndex } = this.state

    return (
      <div className='app'>
        <TabControl titles={titles} tabClick={index => this.tabClick(index)}/>
        <h1>{titles[tabIndex]}</h1>
      </div>
    )
  }
}
非父子组件通信
Context 全局数据共享
类似于redux,官方文档地址
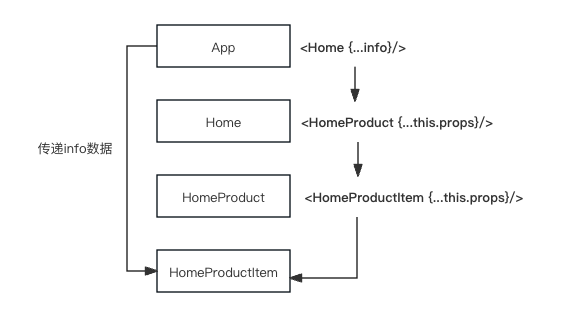
方式一:通过props一层层传递到目标子组件(这里可以用属性展开spread props方式传递)

方式二:使用Context,提供了一种在组件之间共享此类数据的方式
类组件
- 使用
React.createContext创建一个Context。
此处的defaultValue只有当没有被context.Provider包裹时(即不是context.Provider的后代元素),组件调用该订阅时,赋予默认值。
// theme-context.js
import React from "react"

// 1.创建一个Context
const ThemeContext = React.createContext(defaultValue)
export default ThemeContext
- 通过
ThemeContext中Provider中value属性包裹后代组件,为后代提供数据。
// Father.jsx父组件
import ThemeContext from "./context/theme-context"
class Father extends Component {
  render() {
    const { info } = this.state

    return (
      <div>
        {/* 第二步操作: 通过ThemeContext中Provider中value属性包裹后代组件,为后代提供数据 */}
        < ThemeContext.Provider  value={{color: "red", size: "30"}}>
          <Home {...info}/>
        < /ThemeContext.Provider >
      </div>
    )
  }
}
- 在需要用到的后代组件中设置组件的
contextType为某一个Context,最后获取数据并使用。
Class.contextType只能使用一次,如果想要共享多个context需要用Context.Consumer。
// HomeInfo.jsx后代组件
import ThemeContext from './context/theme-context'

// 3.第三步操作: 设置组件的contextType为某一个Context(订阅)
HomeInfo.contextType = ThemeContext

export class HomeInfo extends Component {
  render() {
    // 4.第四步操作: 获取数据, 并且使用数据
    console.log(this.context)

    return (
      <div>
        <h2>HomeInfo: {this.context.color}</h2>
      </div>
    )
  }
}
函数式组件
Context.Consumer也可以用在类组件中,可多次使用。
<MyContext.Consumer>
  {value => /* 基于 context 值进行渲染*/}
</MyContext.Consumer>
// eg.
function HomeBanner() {
  return <div>
    {/* 函数式组件中使用Context共享的数据 */}
    <ThemeContext.Consumer>
      {
        value => {
          return <h2> Banner theme:{value.color}</h2>
        }
      }
    </ThemeContext.Consumer>
  </div>
}
‼️什么时候使用 Context.Consumer 呢?
- 当使用
value的组件是一个函数式组件时; - 当组件中需要使用多个
Context时;
事件总线
- 使用场景:兄弟组件传值
- 创建一个中央事件总线
EventBus - 兄弟组件通过
emit触发自定义事件,emit第二个参数为传递的数值 - 另一个兄弟组件通过
on监听自定义事件
此处使用hy-event-store第三方库来演示。
// event-bus.js
import { HYEventBus } from "hy-event-store"

const eventBus = new HYEventBus()

export default eventBus
// children1.jsx
export class children1 extends Component {
  foo() {
    console.log("这是一个事件总线触发函数")
    eventBus.emit("fooEvent", "hello", 18, 1.88, {nickname: "kobe", level: 99})
  }

  render() {
    return (
      <div>
        <button onClick={e => this.foo()}>触发事件总线</button>
      </div>
    )
  }
}
// children2.jsx
export class Children2 extends Component {
  constructor() {
    super()

    this.state = {
      name: "",
      age: 0,
      height: 0
    }
  }

  componentDidMount() {
    // eventBus.on("bannerPrev", (name, age, height) => {
    //   console.log("app中监听到bannerPrev", name, age, height)
    //   this.setState({ name, age, height })
    // })

    eventBus.on("fooEvent", this.fooClick)
    // eventBus.on("fooEvent", this.fooClick.bind(this))
    // eventBus.on("fooEvent", this.fooClick, this)
  }

  fooClick = (name, age, height) => {
    console.log("children2组件中监听到fooClick", name, age, height)
    this.setState({ name, age, height })
  }

  componentWillUnmount() {
    // 移除监听
    eventBus.off("fooEvent", this.fooClick)
  }

  render() {
    const { name, age, height } = this.state

    return (
      <div>
        <h2>children2 Component: {name}-{age}-{height}</h2>
      </div>
    )
  }
}
插槽
- 子组件通过使用
this.props.children实现插槽(children是一个数组)
class Father extends Component {
  render() {
    return (
      <div>
        {/* 子组件通过使用this.props.children实现插槽(children是一个数组) */}
        <NavBar>
          <button>按钮</button>
          <h2>哈哈哈</h2>
          <i>斜体文本</i>
        </NavBar>
      </div>
    )
  }
}
class NavBar1 extends Component {
  render() {
    const { children } = this.props
    return (
      <div className='nav-bar'>
        <div className="left">{children[0]}</div>
        <div className="center">{children[1]}</div>
        <div className="right">{children[2]}</div>
      </div>
    )
  }
}
// 传入的插槽类型限制
NavBar.propTypes = {
   children: PropTypes.array
}
- 通过使用
props实现插槽(常用)
class Father extends Component {
  render() {
    const btn = <button>按钮2</button>
    return (
      <div>
        {/* 使用props实现插槽 */}
        < NavBarTwo
          leftSlot={btn}
          centerSlot={<h2>呵呵呵</h2>}
          rightSlot={<i>斜体2</i>}
         / >
      </div>
    )
  }
}
class NavBar2 extends Component {
  render() {
    const { leftSlot, centerSlot, rightSlot } = this. props
    return (
      <div className='nav-bar'>
        <div className="left">{leftSlot}</div>
        <div className="center">{centerSlot}</div>
        <div className="right">{rightSlot}</div>
      </div>
    )
  }
}
作用域插槽(Tabbar 案例改编)
父组件替换插槽的标签,但是内容由子组件来提供。通过在子组件使用带参数的回调函数(父组件传递给来的)实现,将子组件的数据通过参数传递给父组件。
// 父组件
class App extends Component {
  constructor() {
    super()

    this.state = {
      titles: ["流行", "新款", "精选"],
      tabIndex: 0
    }
  }

  tabClick(tabIndex) {
    this.setState({ tabIndex })
  }

  getTabItem(item) {
    if (item === "流行") {
      return <span>{item}</span>
    } else if (item === "新款") {
      return <button>{item}</button>
    } else {
      return <i>{item}</i>
    }
  }

  render() {
    const { titles, tabIndex } = this.state

    return (
      <div className='app'>
        <TabControl
          titles={titles}
          tabClick={i => this.tabClick(i)}
          // itemType={item => <button>{item}</button>}
          itemType={item => this.getTabItem(item)}
        />
        <h1>{titles[tabIndex]}</h1>
      </div>
    )
  }
}
// 子组件
class TabControl extends Component {
  constructor() {
    super()

    this.state = {
      currentIndex: 0
    }
  }

  itemClick(index) {
    // 1.自己保存最新的index
    this.setState({ currentIndex: index })

    // 2.让父组件执行对应的函数
    this.props.tabClick(index)
  }

  render() {
    const { titles,  itemType  } = this.props
    const { currentIndex } = this.state

    return (
      <div className='tab-control'>
        {
          titles.map((item, index) => {
            return (
              <div
                className={`item ${index === currentIndex?'active':''}`}
                key={item}
                onClick={e => this.itemClick(index)}
              >
                {/* <span className='text'>{item}</span> */}
                {/* 实现父组件传递过来的带参数的回调函数,将数据在返回给父组件用以显示 */}
                {itemType(item)}
              </div>
            )
          })
        }
      </div>
    )
  }
}